Como mudar de Rede Pública para Privada no Windows

1 – Pressione as teclas Windows + R e digite regedit para abrir o editor de registro do Windows

2 – Localize a chave

HKEY_LOCAL_MACHINE\SOFTWARE\Microsoft\Windows NT\CurrentVersion\NetworkList\Profiles

3 – Ao expandir a pasta Profiles seleciona a chave onde o Item ProfileName corresponda ao usuário do sistema

4 – Dê um duplo clique no item Category e altere o valor para 1 que corresponde a rede privada. Clique em OK.

5 – Reinicie o computador para a alteração entrar em vigor

How To Switch Network From Public To Private And Domain In Windows 10

1. Press  + R and put regedit in Run dialog box to open Registry Editor (if you’re not familiar with Registry Editor, then click here). Click OK.

2. In the left pane of Registry Editor, navigate to following registry key:

HKEY_LOCAL_MACHINE\SOFTWARE\Microsoft\Windows NT\CurrentVersion\NetworkList\Profiles

3. At this registry location, expand the Profiles key in the left pane. Then you’ll see long sub-keys with different Globally Unique Identifiers (GUIDs). The number of sub-keys here equals to number of networks you’ve joined till date and each network has a unique sub-key. In the corresponding right pane of sub-key, locate the ProfileName registry string. Its Value data should correspond to the name of respective network. So in this way, select the GUID for your network and in the right pane, look for Category named registry DWORD. Double click on it to modify its Value data and so the location type:

4. In the above shown box, set the Value data to 1 for Private0 for Public and 2 for Domain network. Click OK after making the registry manipulation and close the Registry Editor.

Restart or reboot your system to make changes effective.

Iniciar Xampp automaticamente ao iniciar o sistema

1. Criar um arquivo dentro de init.d chamado lampp
sudo gedit /etc/init.d/lampp

2. Escrever o código abaixo para rodar o script de inicialização do XAMPP

#!/bin/bash
/opt/lampp/lampp start

3. Atribuir a permissão de execução ao arquivo
sudo chmod +x /etc/init.d/lampp

4. Use update-rc.d para ativar o script em tempo de execução do sistema
sudo update-rc.d lampp defaults

Atualização do Google Chrome está gerando erro de CORS policy em alguns sites: The request client is not a secure context and the resource is in more-private address space local

Erro: The request client is not a secure context and the resource is in more-private address space local

Solução:

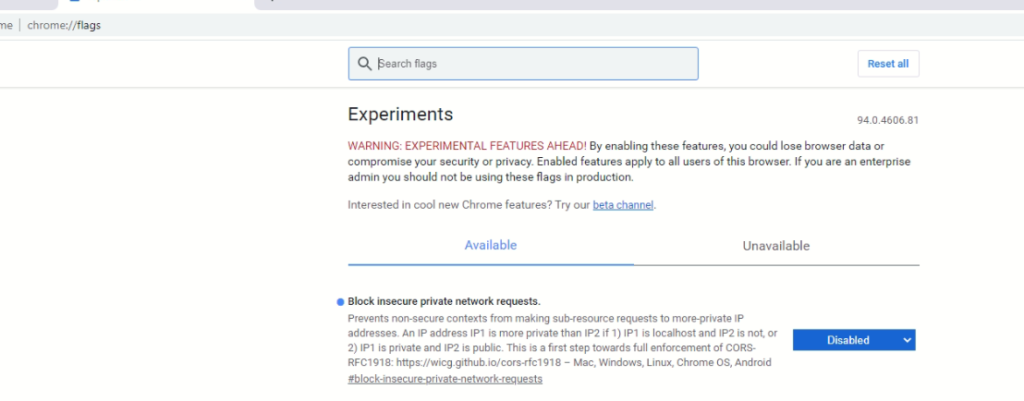
Digite chrome://flags/ na url do navegador e altere a flag “Block insecure private network requests.dedefault” para “Disabled”.

Chrome future update Restrict “private network requests” has been blocked by CORS policy: The request client is not a secure context and the resource is in more-private address space local

has been blocked by CORS policy: The request client is not a secure context and the resource is in more-private address space local

going to chrome://flags/ for a client machine and toggling the setting “Block insecure private network requests.” from “default” to “Disabled”.

Problema com certificado DST Root CA X3 expirado (e-Social e outros serviços do governo)

Hoje, o certificado DST Root CA X3 expirou, deixando muitos dispositivos na Internet com problemas para se conectar a serviços e certificados que usam essa CA raiz, incluindo aqueles que usam certificados Let’s Encrypt.

Alguns desses dispositivos problemáticos incluem telefones Samsung Galaxy, iPhones, VDI zero e thin clients e até mesmo firewalls Sophos UTM.

No meu ambiente, notei uma série de problemas ao navegar em sites que usam os certificados gratuitos Let’s Encrypt, incluindo e-Social e alguns serviços do governo, pois o serviço Web Protection Web Filtering em meu firewall Sophos UTM relataria que o certificado expirou e não me permite acesso aos sites que o usam .

O PROBLEMA

Let’s Encrypt originalmente usou o certificado “DST Root CA X3” para emitir certificados Let’s Encrypt. No entanto, à medida que o tempo passou e o serviço não foi mais usado, eles agora usam “ISRG Root X1” e “ISRG Root X2” como CA de raiz e “Let’s Encrypt R3” como um certificado intermediário.

Dispositivos mais antigos podem estar usando a CA Root mais antiga, que expirou hoje (30 de setembro de 2021). Consulte https://letsencrypt.org/docs/dst-root-ca-x3-expiration-september-2021/ para obter mais informações.

SOLUÇÃO

Para corrigir esse problema, você precisa adicionar as 2 novas CAs raiz ao seu computador ou dispositivo.

Certificados de CA raiz (formato PEM):


ISRG Root X1
 (ou ISRG Root X1 DER Format)

ISRG Root X2 (ou ISRG Root X2 DER Format)

Certificado Intermediário (PEM format):

Let’s Encrypt R3 (Or Let’s Encrypt R3 DER Format)

Você pode baixá-los clicando nos links acima ou ir para https://letsencrypt.org/certificates/ para mais informações e fazer o download, se você não confiar nos links acima.

Depois de baixar e adicionar essas CAs raiz e a CA intermediária ao seu computador ou dispositivo, você deve ter toda a cadeia de certificados para validar os certificados do Let’s Encrypt. Os certificados Let’s Encrypt que são usados ​​em sites que você visita e que você pode ter implantado em seus servidores agora devem funcionar sem problemas.

Se ainda estiver tendo problemas, você pode tentar excluir o certificado “DST Root CA X3” de suas CAs raiz existentes. Além disso, pode ser necessário fechar e reabrir qualquer software e / ou navegador para que funcione com o novo certificado.

Correção do firewall para verificação / filtragem de HTTPS (Sophos UTM como exemplo)
Se você tiver um firewall que verifica o tráfego HTTPs, precisará adicionar os certificados acima à lista de autoridade de certificação HTTPS.

Por exemplo, para corrigir isso no firewall Sophos UTM, siga as instruções abaixo:

Baixe os 3 certificados acima.
Faça logon no seu Sophos UTM
Navegue até a guia “Web Protection”, “Filtering Options” e “HTTPS CAs”.
Desative o antigo certificado “Digital Signature Trust Co. DST Root CA X3” na lista.

Usando “Carregar CA local”, navegue até e selecione 1 dos 3 certificados e clique em carregar.
Repita a etapa 5 para cada um dos 3 certificados listados acima.
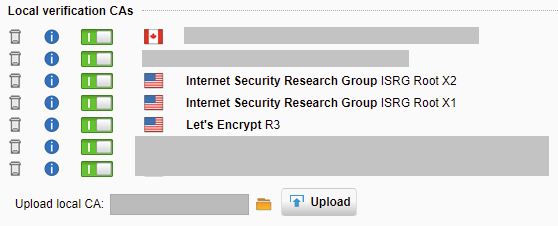
O problema foi corrigido! Agora você deve ver todos os 3 certificados na lista “CAs de verificação local”.

As etapas devem ser semelhantes para outros firewalls que fornecem varredura e filtragem HTTPS.

DST Root CA X3 Certificate Expiration Problems and Fix

Today, the DST Root CA X3 certificate expired, leaving many devices on the internet having issues connecting to services and certificates that use this Root CA, including those using Let’s Encrypt certificates.

Some of these problematic devices include Samsung Galaxy phones, iPhones, VDI zero and thin clients, and even Sophos UTM firewalls.

In my environment, I noticed a number of issues when browsing to websites that use the free Let’s Encrypt certificates, as the Web Protection Web Filtering service on my Sophos UTM firewall would report the certificate has expired and not allow me access to the websites using it.

The Problem

Let’s Encrypt originally used the “DST Root CA X3” certificate to issue Let’s Encrypt certificates. However, as time has passed and the service has been used more, they now use “ISRG Root X1” and “ISRG Root X2” as Root CA’s and “Let’s Encrypt R3” as an intermediate certificate.

Older devices may be using the older Root CA which expired today (September 30th, 2021). Please see https://letsencrypt.org/docs/dst-root-ca-x3-expiration-september-2021/ for more information.

The Fix

To fix this issue, you need to add the 2 new Root CAs to your computer or device.

Root CA Certificates (PEM format):

Intermediate Certificate (PEM format):

You can download them by clicking the links above or go to https://letsencrypt.org/certificates/ for more information and to download if you don’t trust the above links.

After downloading and adding these Root CAs and the Intermediate CA to your computer or device, you should have the full certificate chain to validate the Let’s Encrypt certificates. The Let’s Encrypt certificates that are used on websites that you visit and that you might have deployed on your servers should now work without any issues.

If you’re still having issues, you can try deleting the “DST Root CA X3” certificate from your existing Root CAs. Also, you may need to close and reopen any software and/or browsers for it to work with the new certificate.

HTTPS Scanning/Filtering Firewall Fix (Sophos UTM as example)

If you have a firewall that scans HTTPs traffic, you’ll need to add the above certificates to the HTTPS Certification authority list.

As an example, to fix this on the Sophos UTM firewall, follow the instructions below:

  1. Download the 3 certificates above.
  2. Log on to your Sophos UTM
  3. Navigate to “Web Protection”, “Filtering Options”, and “HTTPS CAs” tab.
  4. Disable the old “Digital Signature Trust Co. DST Root CA X3” Certificate in the list.
  5. Using the “Upload local CA”, browse to and select 1 of the 3 certificates, then click upload.
  6. Repeat step 5 for each of the 3 certificates listed above.
  7. The issue has been fixed! You should now see all 3 certificates in the “Local verification CAs” list.

The steps should be similar for other firewalls that provide HTTPS Scanning and Filtering.